The pico power supply came today so I was all pumped up to get this whole thing together. I cut off some audio mobo connectors from an old case and soldered them with the original NES power switch and LED. I screwed the wireless antenna to the back. I then started lowering the mobo in, gently......gently.....and then BAM.
The motherfucker wouldn't go down! The small amount that the power supply juts out is just enough to keep the motherboard from going down into the case! So naturally I was pissed, and called the other retro fool which gave the suggestion of an atx extension cable which is the route we are going to go. If that does not work we will try to bend the screws over, but that is not our preferred course of action.
Having nothing else to do I decided to hook it all up and see what I got. I've never used a pico power supply before, nor have I soldered power buttons. I plugged everything in and it worked on the first try. My buddy and I then spent the next hour playing Ducktales and R.C. Pro Am. We are in the home stretch folks.
Monday, April 11, 2011
Friday, April 8, 2011
NES Mod, Controller ports
The USB adapters came for the controller ports today, and I was a tad nervous since my brother usually does the soldering round these parts. He was not here tonight so I sucked it up and gave it a shot. After following a very easy to read wiring diagram on the retrousb web site, I got to it. My first attempt did not work, and after I inspected the soldering job I did it was no wonder. It looked like complete shit, I think the solder was embarrassed to even be on there. After a more meticulous attempt, I plugged the usb into the pc and a controller into the port and........success! I'm very proud of myself (and yes I know this is the easiest shit ever). Everything else besides the pico power supply has arrived so we should be done within a week!
Thursday, April 7, 2011
NES Mod - Aesthetics!
Small update, the re-finishing of the casing is complete, stickers removed and plastic sanded down so it has that "New 80s Shine." All parts are now on order and we are waiting for them to come in. A few pictures below.
Friday, April 1, 2011
NES Mod, oy vay
Well, after configuring Superbox, you would think a simple 1-2 system setup would be cake, right? WRONG! The problem comes from using only 1 control method (NES Controller) which does not have a lot of buttons. The second problem comes from configuring Hyperspin. When HS closes a game, it pretty much brute force closes the program and the program does not shut down normally. Because of this, any changes made while the emulator is running is not saved. This has not been an issue thus far, but this also means that games are not saved. Any progress made in Zelda, Final Fantasy, or anything with a save feature will be lost. So the journey to find a solution began!
I won't bore you with the many details of what I've been trying to do, but most of it sucks. I'm to the point where I can get the emulator closing with saving from HS, but can't do it from the controller.
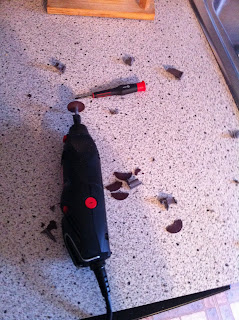
I've also been having some fun with my dremel. I took out the raised part of the plastic on the bottom of the casing and sanded down the excess plastic. I did take off a screw hole mount that the power button needs, but that won't be a big deal to fix. (I went through a few cutting pieces while doing this as you can see below)
I've also made a custom boot and login screen for Windows 7 to help mask the fact that it's Windows 7. Of course you are still going to be able to tell it's a PC when booting, but there are some things you can't avoid.
So for a short checklist, all of the NES data is on there, I've decided to add Game Boy as well since it was an 8 bit Nintendo System, and of course Boxee for Netflix (which I found wheel art for on the HS FTP site!) The motherboard (obviously) is here, kits are on the way to convert the original controller ports to USB, and I still have to order the pico psu.
Subscribe to:
Posts (Atom)


